Surveying Turning Points
Most superintendents had a surveying class in college, but when a skill isn’t used everyday, it can be difficult to remember the lessons that were learned many years ago. I thought it would be helpful to provide a basic chart that could be kept as a reference for the next time you need to survey an area for drainage. This chart can be used in a log book that can be purchased from any surveying store, or created in any program, such as Excel, that can create columns. The six columns are set up as shown below.

There are six columns in your log. The first column identifies the point that is being shot. The second column is the Bench Mark Elevation, or Turning Point Elevation. Column 3 is the rod reading. This reading is added to the elevation of the BM (or TP) to calculate the height of instrument in Column 4. Column 5 is the rod reading that is subtracted from the height of instrument to determine the elevation. Column 6 is the elevation of the spot, and will always be the same as column #2.
A review of the basic premise of surveying might be in order. For the moment, we will assume that we have a known benchmark on the property. From that benchmark, we can shoot every elevation on the property, but there will be a need to shoot turning points because of the necessity of moving the instrument multiple times.
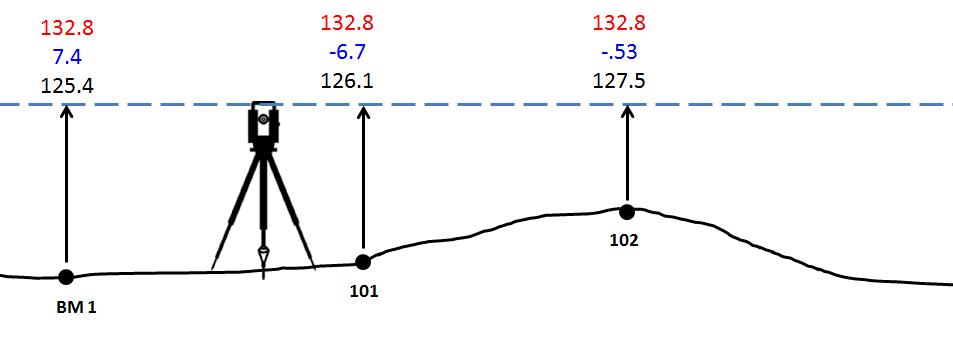
In the diagram below, we see a depiction of an instrument shooting three spots on hole number 1. The first is a bench mark BM#1 that we know is an elevation of 125.4 (black). The reading on the rod is 7.4(blue). This reading is added to the bench mark, and gives us the height of instrument of 132.8 (red).
Hole 1
The next point is 101g, which may be something such as a rim elevation of an existing basin. In this case, we don’t know the elevation like we did with the BM, but what we do know is that the height of instrument is 132.8 (red). So, subtracting the rod reading -6.7 (blue) from the H.I., we get the elevation of 101 as 126.1 (black). The same steps give us an elevation on 102 as 127.5 (black).
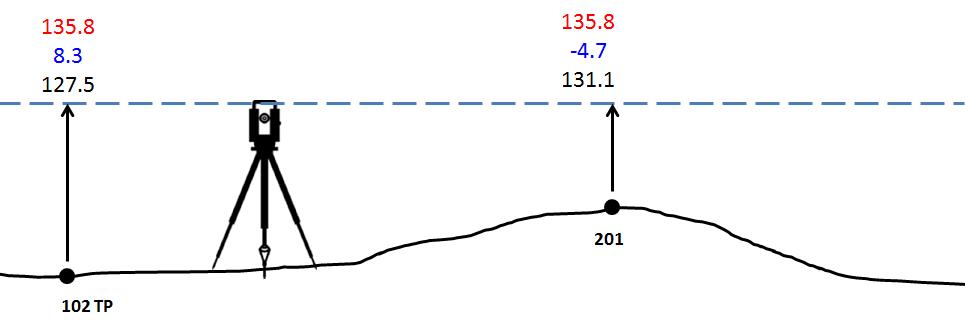
Now we want to shoot spots on hole #2, but we can’t see those spots from the location of our first level position. Therefore, we have to pick a new spot that we can see (one of the points on number 1 that has already been shot, plus the spots on number 2). In this case, we set the instrument up where we can still see 102. This now becomes 102TP in your log book. We know the elevation of 102 is 127.5, so this is recorded in column #2. From your new level position, we get a rod reading of 8.3. The rod reading + in column 3 is added to the elevation in column 2 to give the new height of instrument in column 4. From that point, all of the readings shot from that level position will be subtracted from 135.8 to give you your elevations. This procedure is repeated around the course until everything is completed.
Â
Hole 2
DEFINITIONS
Benchmark is an actual elevation of a point taken from a previous survey. If a known benchmark is not available, an elevation is assigned to a spot for purposes of surveying the relative elevations of points on the property.
Height of Instrument is the reading, plus the known elevation of a benchmark or turning point.
Turning point is a spot that is shot from two different level positions.
There are six columns in your log:
Column 1 identifies the point that is being shot.
Column 2 is the B.M. elevation, or Turning Point Elevation.
Column 3 is the rod reading. This reading is added to the elevation of the BM (or TP) to calculate the height of instrument.
Column 4 is the height of instrument.
Column 5 subtracts the rod reading from the height if instrument to give the elevation.
Column 6 is the elevation of the spot, and will always be the same as column #2.
Column 6 is the elevation of the spot, and will always be the same as column #1.